Vita3K Setup Guide: Firmware, Game Installs, File Formats, and Android Problems
This guide helps you set up Vita3K properly, install the required PS Vita firmware and font package, add games the right way, and avoid the file-format and Android issues that usually stop new users before they even reach gameplay.
Vita3K setup starts before you install your first game
Vita3K is not the kind of emulator where you open one ROM file and immediately start playing. PS Vita Roms expect parts of the original system environment to exist. That includes firmware files, system modules, fonts, user data, app folders, license paths, and update data.
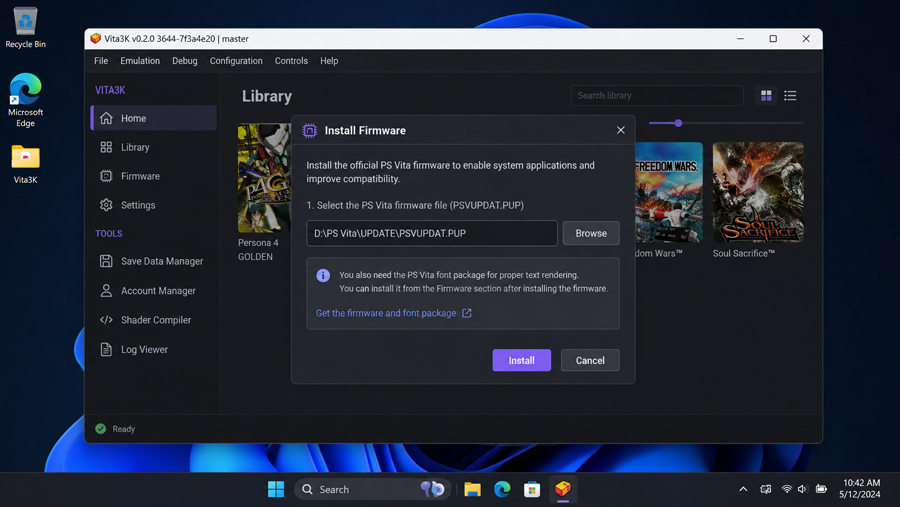
That is why a clean Vita3K setup should begin with the PS Vita firmware and the additional font package. Skipping either one can make a game look broken even when the actual game dump is fine.
Install both before testing games:
- Open Vita3K.
- Go to the firmware installation option inside the emulator.
- Install the main PS Vita firmware file, usually named PSVUPDAT.PUP.
- Install the additional font package separately.
- Restart Vita3K before installing games.
The font package is not a small cosmetic detail. Missing fonts can cause blank text, broken menus, crashes after the title screen, or games that technically boot but become impossible to use once dialogue or UI text appears. If a text-heavy game fails strangely, check the font package before touching graphics settings.
Download Vita3K from the right page
Use a current build instead of an old mirror or repack. Vita3K is still experimental in 2026, and small emulator updates can change whether a game boots, crashes, or renders correctly.
- You can get the emulator build here: Download Vita3K. Or check the official Vita3K GitHub for the absolute latest experimental nightlies.
After installing Vita3K, open the emulator once and finish the first-run setup before adding games. Install the firmware, install the font package, create or select a user profile if Vita3K asks for one, and only then move on to game installation.
The first mistake: trying to open Vita games like normal ROMs
Most Vita3K game problems start with the wrong expectation. Vita3K games are usually installed into the emulator. They are not usually opened again and again as simple standalone ROM files.
On desktop, you normally use Vita3K’s install option, select a supported package or archive, and let the emulator unpack and register the game. Once that is done, the game appears in Vita3K’s interface like an installed app on a real PS Vita.
This difference matters because a file can be perfectly valid and still not appear in your game list if you only selected it through the wrong menu or left it sitting in a folder without installing it.
Vita3K file formats: which inner formats actually work?
PS Vita dumps are more confusing than most emulator libraries because the same game can show up in several different forms. You may see a .pkg, .vpk, .zip, NoNpDrm dump, FAGDec dump, work.bin, license files, update folders, and DLC folders. These are not just different names for the same thing.
| File or term | Common misunderstanding | What it means in Vita3K |
|---|---|---|
| .pkg | Users often treat it like a ROM file. | A .pkg is usually installed through Vita3K’s package installer. Some packages also need license data before they work correctly. |
| .vpk | Users expect every VPK to install cleanly. | A VPK is an installable archive, but old, damaged, or badly packed VPK files can fail because the internal folder structure is wrong. |
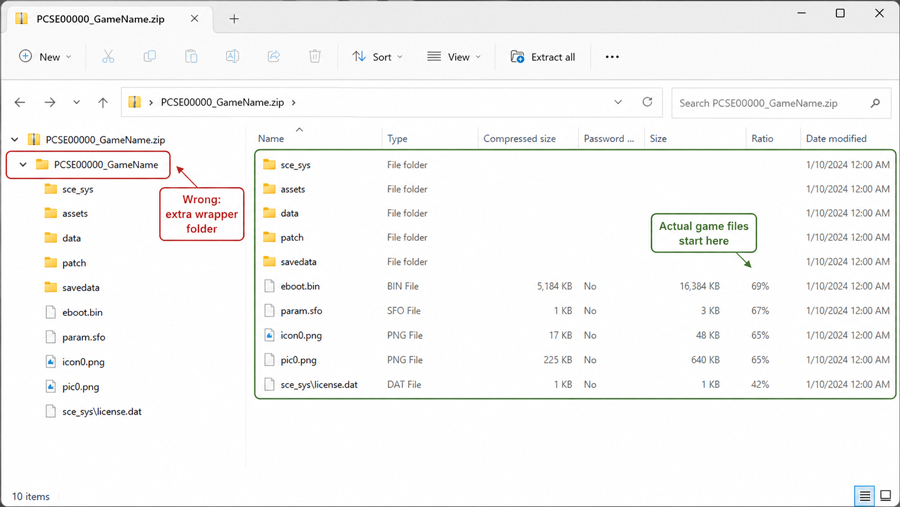
| .zip | Users zip any folder and expect Vita3K to read it. | The archive must contain the correct Vita app structure. If the real game files are buried inside an extra parent folder, installation may fail. |
| NoNpDrm | Users think it is one file type. | NoNpDrm usually refers to a dumped Vita game structure with license-related data. Folder layout matters. |
| FAGDec | Users treat it as the same thing as NoNpDrm. | FAGDec is another dump/decryption method. The output may need to be packed or installed differently before Vita3K accepts it. |
| work.bin | Users often ignore it. | It can be important for DLC and license handling. If it is missing or misplaced, installed content may not appear in-game. |
| .rif / license data | Users assume the game no longer needs license data after dumping. | Some content still depends on correct license files or fake license data being placed where Vita3K expects it. |
The point where most Vita3K installs fail
If Vita3K opens but your game does not work, the problem is usually not the emulator window, controller setup, or resolution scale. Most failed installs come from one of three places: incomplete firmware, a badly packed game archive, or missing license data.
Firmware installed, but fonts missing
This is easy to miss because Vita3K itself may still open normally. The emulator interface can look fine, but a game that needs Vita system fonts may show blank text, broken menus, or crash when it reaches a dialogue-heavy scene. Always install the font package along with the main firmware before judging a game as incompatible.
The archive has the wrong folder level
A common broken zip looks fine at first glance, but the real Vita app folder is one level too deep. Vita3K expects a specific internal structure. If installation fails immediately, open the archive and check what is inside instead of repacking it blindly. A valid structure should immediately show the sce_sys folder and game executables, not another wrapper folder.
The base game works, but DLC or updates do not
DLC problems are often license problems, not emulator problems. If the base game launches but extra content does not appear, check the DLC title ID folder, work.bin, and license placement. Reinstalling Vita3K usually does not fix this because the broken part is the content structure.
Desktop setup: keep the install path simple
On Windows, Linux, or macOS, keep Vita3K and your install files in simple folders. Avoid strange characters in folder names, cloud-synced folders that may lock files during installation, and deeply nested archive paths.
A safe first setup looks like this:
- Install Vita3K.
- Open it once and finish the initial setup.
- Install the PS Vita firmware.
- Install the additional font package.
- Install one small game first.
- Test that game before adding updates, DLC, and larger titles.
Do not use a demanding 3D game as your first test. A smaller 2D game tells you more about the base setup. If a simple game installs and boots, the emulator, firmware, and install process are probably working. If it fails before gameplay, fix the setup before chasing performance tweaks.
Android setup has its own problems
Vita3K on Android is more sensitive than the desktop version because Android adds its own problems: restricted storage access, file picker limitations, Vulkan driver quality, custom GPU drivers, and aggressive battery management.
If Vita3K cannot see your game files, move them to a simple folder such as Downloads or a dedicated Vita3K folder. On some Android versions, the file picker will not expose every folder, especially app-specific folders or certain SD card locations.
GPU behavior also varies a lot. A Snapdragon device with a good Vulkan driver may run a game differently from a Mali device even if both phones look powerful on paper. In one Android test case, changing to a newer Turnip driver fixed heavy geometry glitches in Gravity Rush on a Snapdragon device, while a Mali-G710 device behaved better with the default driver path and conservative settings. That kind of difference is normal with Vita3K on Android, so do not assume one driver recommendation applies to every phone.
Battery management can cause its own false problems. If Vita3K stutters badly, pauses in the background, or gets killed when switching apps, check Android’s battery settings for the emulator. Set it to unrestricted or performance-friendly behavior if your phone allows it.
Settings worth touching first
The safest first launch is boring: default renderer, conservative resolution scale, no DLC, no patches, and no custom driver unless your device clearly needs one. The goal is to make the game boot once before you start improving the image quality.
- Keep resolution scaling low for the first boot.
- Use default graphics settings before testing custom drivers.
- Install and test the base game before adding updates or DLC.
- On Android, check Vulkan support before blaming the game dump.
- Change one setting at a time after the game reaches gameplay.
This matters because Vita3K problems can look similar from the outside. A missing font package, a bad license file, and a weak Android GPU driver can all end in a black screen or crash. If you change ten things at once, you will not know which one mattered.
Examples that show why Vita3K is inconsistent
Persona 4 Golden is a good example of why firmware and fonts matter. It uses a lot of dialogue, menus, and text-heavy scenes. If the font package is missing, the issue may look like a game compatibility problem even though the setup is incomplete.
Gravity Rush is a better test of graphics drivers and device behavior. It is more demanding and can expose rendering bugs that do not appear in simpler 2D games. On Android especially, the GPU and driver can decide whether the game is playable, glitchy, or unstable.
Muramasa Rebirth and similar 2D titles are better first tests because they reduce the number of variables. If a lighter game fails before boot, focus on firmware, fonts, file structure, and installation method before changing performance settings.
DLC-heavy games are where many users get stuck after the base game already works. If DLC does not appear, check the add-on folder, title ID, work.bin, and license data. A working base game does not automatically mean the DLC was installed correctly.
Old compatibility reports can waste your time
Vita3K is still experimental in 2026, so compatibility information gets old quickly. A game that failed months ago may now boot. A game that worked on one Android driver may break on another. A desktop result may not tell you much about a Mali phone, and a Snapdragon result may not apply to every Snapdragon device either.
When you read a compatibility report, look for the Vita3K build date, platform, GPU, driver, game region, update version, and whether DLC was installed. Without those details, “works” and “doesn’t work” are not very useful for this emulator.
A cleaner way to build your Vita3K library
Add games in layers instead of dumping everything into Vita3K at once. First confirm firmware and fonts. Then install one simple game. Then test a bigger game. After that, add updates and DLC. Only then start changing resolution, drivers, and performance options.
For Vita3K, small details matter: the dump type, license data, update version, Android GPU driver, and emulator build can all change the result. Keeping those details straight is the difference between fixing the real problem and reinstalling the emulator for no reason.