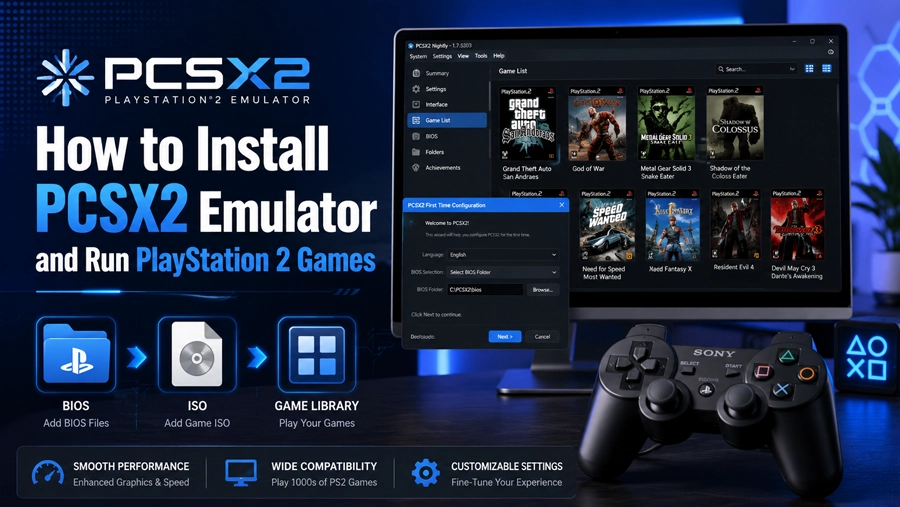
How to Install PCSX2 Emulator and Run PlayStation 2 Games
The PCSX2 Emulator is still the most practical way to play PlayStation 2 games on a modern computer. Most first-time failures come from the same handful of mistakes: the BIOS folder path is one level too high, the game file is still sitting inside a ZIP archive, the CUE file got separated from the BIN file, or the graphics settings were pushed to 4x resolution before confirming the game even boots. Fix those four things and the vast majority of first-run problems disappear.
This guide covers installation on Windows, macOS, Linux, and Android, the BIOS setup step that most guides rush through, supported formats including CHD compression, a starter settings table, game-specific notes, and a troubleshooting list for the issues that actually come up.
PCSX2 status in 2026
PCSX2 is still actively maintained in 2026. The official project supports Windows, macOS, and Linux, and current builds use the newer Qt interface. This matters because many older tutorials still show the old plugin-style setup screen, which no longer matches the version most people download today.
On Windows, PCSX2 is the easiest to set up and usually the best-supported option. You get modern graphics backends, automatic game scanning, controller profiles, virtual memory cards, save states, widescreen patches, per-game settings, and internal resolution scaling.
Linux support is also in good shape. AppImage is useful when you want to download one file and run it without changing much on the system. Flatpak is cleaner if you already manage apps through Flathub, but folder permissions can sometimes stop PCSX2 from reading BIOS files or game folders.
macOS support is available too, especially for Apple Silicon Macs. Many popular PS2 Roms run well, but heavier titles still need realistic settings. Do not raise the internal resolution until the game is already running at full speed at native resolution.
Android and iOS need a separate explanation. The official PCSX2 desktop build is not available as an Android APK. Mobile users rely on PCSX2-based ARM projects instead. In 2026, ARMSX2 is one active project for ARM devices including Android and iOS. Older options such as AetherSX2 and NetherSX2 are still used by some, but they are separate from the official desktop release and are no longer actively updated.
Before downloading anything, match the build to the device. A Windows installer, a Linux AppImage, a macOS app, and an Android APK are completely different packages.
Download PCSX2 Emulator
Quick Link: Download the latest PCSX2 Emulator build here
Recommendation: Use the current Qt builds instead of old plugin-based packages. The newer Qt versions are easier to configure, support automatic game scanning, and match the interface used in this guide.
Avoid old emulator packs that include random folders, outdated plugins, or pre-made settings from years ago. Current PCSX2 builds do not need the old GSdx plugin selection process that older guides still describe.
Installing PCSX2 on Windows
Windows is the most straightforward platform for PCSX2. Use the installer for a normal app-style setup, or the portable ZIP/7z archive if you want everything inside one self-contained folder.
After downloading, install normally or extract the portable version into a folder such as C:\Emulators\PCSX2. Do not run PCSX2 from inside the compressed archive. Extract first, then open the emulator.
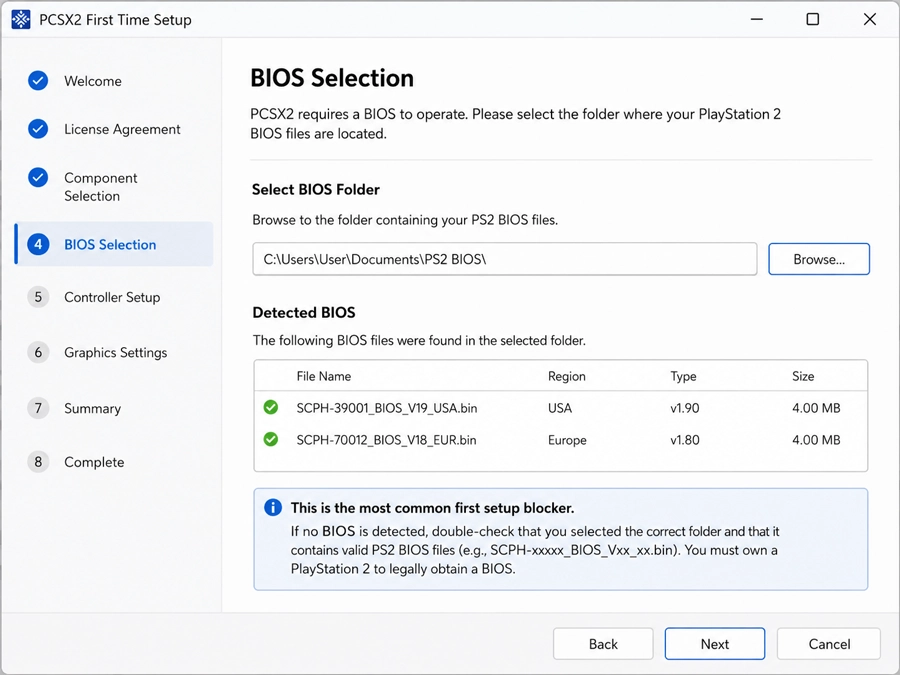
On first launch, PCSX2 asks for basic setup details. The most important step is the BIOS folder — select the folder that directly contains your PS2 BIOS files, not a parent folder that contains another folder inside it.
Once PCSX2 detects the BIOS, point the emulator to your PS2 games folder, then configure the controller before launching anything.
On Windows, Xbox controllers are usually the least troublesome because the system already handles them natively. A PlayStation controller works just as well, but check the button layout once after mapping — face buttons, triggers, and analog sticks sometimes need a remap before the first game feels right.
The installer version stores settings, covers, saves, and memory card files in the Windows user folders. The portable version keeps more data close to the emulator folder, which makes it easier to move the setup later.
Installing PCSX2 on Android (ARMSX2 setup)
The official PCSX2 desktop release does not have an Android version. On Android, you need a PS2 emulator built specifically for ARM hardware. ARMSX2 is the most actively maintained PCSX2-based option for Android and iOS in 2026.
Step-by-step for ARMSX2:
After downloading the ARMSX2 APK, install it like any sideloaded app. Android will ask you to allow installation from your browser or file manager — approve that permission, install the app, and open it once so it creates its initial settings folders.
On first launch, ARMSX2 will ask for a BIOS folder and a games folder. Set both before trying to launch any game.
Folder structure that avoids most Android permission problems:
- Games: Documents/PS2 Games or Download/PS2
- BIOS: Documents/PS2 BIOS
On Android 13 and Android 14, the native file picker blocks access to protected locations such as Android/data. If your ISO folder appears blank or returns a permission error, the fix is almost always moving the files to a normal user folder like the ones above — not a settings change inside the emulator.
Advanced users sometimes work around this with ZArchiver or Shizuku-based file access, but moving the folder is faster for most people.
Performance starting point for Android:
- Set resolution to native first. Check whether the game reaches full speed before raising anything.
- After confirming stable speed, try 2x resolution if your device can handle it.
- High-end Snapdragon devices handle heavier games better than budget phones and most Mali GPU devices.
- Heavy titles like God of War, Shadow of the Colossus, and Gran Turismo 4 can still drop frames even when lighter PS2 games run perfectly. If one game is slow, test two or three lighter games before changing global settings.
Note: If you already have a working AetherSX2 or NetherSX2 setup, it will likely continue working. The main reason to switch to ARMSX2 is continued updates and fixes for newer Android versions.
Installing PCSX2 on macOS
PCSX2 on macOS installs like most Mac apps. Download the macOS build, open the archive, and move the PCSX2 app into the Applications folder.
The first launch may be blocked by macOS security. When that happens, open System Settings, go to Privacy & Security, and allow the app to open. You can also right-click the app, choose Open, and confirm the launch from that dialog.
After PCSX2 opens, select your BIOS folder, add your PS2 games folder, and configure your controller. On Apple Silicon Macs, many games run well, but test at native resolution first before pushing internal resolution higher. A game that runs cleanly at native resolution may stutter once upscaled too far.
Keep games and BIOS files in a local folder such as Documents/PCSX2 Games. Cloud-synced folders such as iCloud Drive can cause PCSX2 to fail to read files, especially when the sync state is incomplete.
Installing PCSX2 on Linux
Linux users usually choose between AppImage, Flatpak, or a distribution package. AppImage is often the least fussy: download it, make it executable, and run it. Flatpak is cleaner if you already use Flathub, but its sandbox restricts folder access until permissions are adjusted.
For AppImage, save the file somewhere easy — Downloads or an Emulators folder. Make it executable, then launch. After PCSX2 opens, select the BIOS folder and add your PS2 games directory.
For most modern Linux systems, Vulkan is a good first graphics backend. OpenGL is still useful when a game has visual problems or the Vulkan driver behaves poorly. Controller behavior can vary depending on the desktop environment, Bluetooth stack, and controller model — check input settings before assuming the game itself is the problem.
If you are using Flatpak and PCSX2 cannot see your BIOS or games folder, the issue is almost always folder access. A simple path like ~/Games/PS2 is easier to grant permissions for than a folder buried inside a mounted drive or protected location.
Supported formats and the storage-saving trick
PCSX2 loads PlayStation 2 games as disc image files. PS2 games were distributed on CD and DVD, so game files are full disc images, not small cartridge-style ROMs.
The most common format is .iso. If you are testing a game for the first time, ISO is the simplest starting point because PCSX2 loads it directly. The most common mistake is leaving the ISO inside a ZIP, RAR, or 7z archive. Extract it first.
Some PS2 CD-based games use .bin/.cue. Keep both files in the same folder and load the .cue file, not just the BIN. The CUE file tells the emulator how the disc tracks are arranged.
Modern PCSX2 builds also support .chd (Compressed Hunks of Data), which is the best long-term format for a large PS2 library. CHD compresses disc images without wrapping them in an archive that must be extracted before use. A large DVD-based game that takes 3–4 GB as an ISO may shrink to 1.5–2 GB as CHD depending on the game data. The practical benefit is space savings without the management overhead of ZIP files.
CHD is recommended for long-term storage once you have confirmed your original ISO or BIN/CUE dump boots correctly. If a game fails after conversion, test the original image first before adjusting emulator settings.
Avoid relying on .gz for new setups — CHD is better supported in modern PCSX2 builds and easier to organize. The .elf format is for homebrew and special PS2 software, not normal retail games.
PCSX2 does not load .cia, .3ds, .nds, .gba, .wbfs, or .rvz. Those belong to other systems.
The BIOS file — what most guides get wrong
PCSX2 needs a PlayStation 2 BIOS file before it can boot normal PS2 games. The BIOS is not optional and not interchangeable with other console BIOS files. It contains system-level code that PCSX2 needs to behave like real PS2 hardware.
This is the step to get right before touching graphics or game settings.
Common BIOS filenames contain strings like SCPH followed by a model number, a region abbreviation, and a version number. For example, SCPH-39001 is a US NTSC model, while SCPH-30004 is a European PAL model. PCSX2 may detect more than one BIOS after scanning the folder if you have multiple dumps.
Which BIOS to use:
- For US NTSC games: use a US BIOS (SCPH-3xxxx or SCPH-7xxxx US region). Especially important if you plan to use 60Hz patches or widescreen patches, where a mismatched region can cause timing issues.
- For European PAL games: use a European BIOS (SCPH-3xxxx or SCPH-5xxxx EU region).
- Mixing regions does not always break a game, but it can produce inconsistent boot behavior and make patch results unpredictable.
BIOS version differences: Older BIOS versions (SCPH-10000, SCPH-18000) were early Japanese launch models and have the most compatibility quirks. Mid-range versions (SCPH-30000 to SCPH-50000 series) are broadly compatible and a reasonable default. Slim PS2 BIOS dumps (SCPH-70000 series and later) work fine for most games but a small number of titles have reported minor differences with these versions. For general use, any mid-range dump from the correct region is a safe choice.
If PCSX2 says “No BIOS found”: The selected folder path is wrong. Select the exact folder that directly contains the BIOS files. PCSX2 does not search subfolders — the files must be one level inside the selected folder.
If a game boots to the PS2 browser instead of launching: PCSX2 is not reading a valid disc image. Try booting the ISO, CHD, or CUE file manually from the File menu. If that fails, test a different game image before changing emulator settings.
Memory cards — easy to overlook, annoying when missed
PCSX2 creates virtual PS2 memory cards, and most PS2 games expect at least one card in Slot 1 before they allow saving. If no memory card is present, some games skip the save option entirely or show an error. A few older titles will even refuse to launch a new game without detecting a card.
PCSX2 usually creates a default memory card automatically during first setup, but it is worth confirming in Settings → Memory Cards that Slot 1 has a card assigned. If the slot is empty, create a new card there.
Save states vs. in-game saves: Save states are useful for quick testing, but they are not a substitute for normal in-game saves. Some games behave differently when resumed from a save state versus a proper memory card save — cutscenes can replay incorrectly, flags can reset, and a few titles have known compatibility problems with save states. For any game you plan to play through properly, use the in-game save system.
If saves are not appearing after a session: Check whether the memory card in Slot 1 has enough free space. PS2 memory cards had a fixed capacity, and PCSX2 mirrors that limit by default. A card formatted at standard size holds roughly 8MB of save data. If it is full, the game will report a save error rather than overwriting automatically.
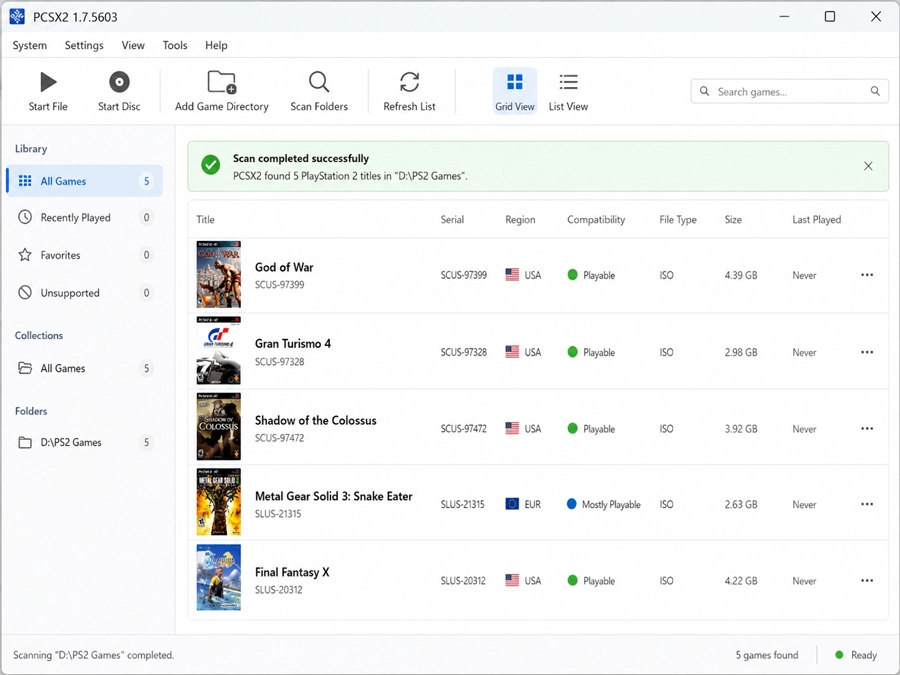
How to add games to PCSX2
The easiest way to manage games is to keep them all in one clearly named folder — something like PS2 Games inside Documents or your main Games folder.
Put your .iso, .chd, or .bin/.cue files there, then add that folder in PCSX2 under Settings → Game List. After adding the folder, run a scan. PCSX2 reads the disc headers and builds the game list with names and regions automatically.
For a quick test, use the manual boot option (File → Boot ISO or similar) and select one game file directly. This is the fastest way to confirm a single file works before organizing the full library.
If a game does not appear after scanning:
- Confirm the file is extracted — not still inside a ZIP, RAR, or 7z archive.
- For BIN/CUE games, keep both files in the same folder. PCSX2 only shows the CUE file in the list.
- On Android Flatpak builds, folder permission is often the reason — move the folder to a standard user location and rescan.
- After adding or moving files, refresh the game list manually. PCSX2 does not always detect new files until a refresh is triggered.
Special setup steps in PCSX2
PCSX2 does not install PS2 games the way some other emulators handle packages. Most PS2 games are loaded directly from disc images. Setup is about pointing the emulator to the right locations and confirming the basic PS2 hardware requirements are present.
- BIOS: Select the folder that directly contains your PS2 BIOS files. Required before normal PS2 games will boot.
- Game folder: Add the folder containing your ISO, CHD, or BIN/CUE files so PCSX2 can build a game list automatically.
- Memory card: Confirm at least one virtual card is assigned to Slot 1. Most PS2 games expect a card there for in-game saves.
- Per-game settings: Use them when one title needs special treatment. A demanding game can stay at native resolution while lighter games run at 3x or 4x.
- Game list refresh: Refresh the list after adding, moving, or renaming game files — new files do not appear until the list is refreshed.
Good first settings for PCSX2
PCSX2 has a lot of settings, but most new users only need to adjust a few. Start with safe defaults, confirm the game boots and runs at full speed, then raise quality step by step.
| Setting | Good first choice | Why it matters in PCSX2 |
|---|---|---|
| Graphics renderer | Vulkan on most modern systems; Direct3D 11/12 on Windows as an alternative; OpenGL when Vulkan causes issues. | Renderer choice affects both speed and visual accuracy. Vulkan is generally faster on modern hardware, but a small number of games have visual glitches with Vulkan that disappear on OpenGL. |
| Internal resolution | Native for initial testing, then 2x or 3x once speed is confirmed stable. | Higher resolution improves clarity but can slow demanding games or trigger scaling artifacts that look like emulator bugs. |
| Texture filtering | Default or bilinear. | Some PS2 effects look wrong when filtering is pushed too far. Aggressive filtering can also break transparency effects in certain titles. |
| Blending accuracy | Basic or default. | Higher blending can fix visual effects in specific games but costs significant performance. Only raise it if a game has visible blending problems at basic settings. |
| V-Sync | Off at first. | V-Sync may reduce tearing but can add input delay and hide speed problems that look like stable performance. |
| Audio | Default backend with time stretching enabled. | Audio crackle is almost always a sign the game is not running at full speed — fix the performance first rather than adjusting audio settings. |
| Controller input | Map a modern controller as a DualShock 2 pad. | Many PS2 games expect analog sticks and pressure-sensitive buttons. Map and test before assuming a control issue is a game bug. |
| Memory card | One standard card in Slot 1. | In-game saves are safer than save states for long play sessions and games with known save-state compatibility issues. |
Hardware context: For a reference point — a mid-range desktop with a CPU around 3.5GHz or faster (Intel Core i5/i7 10th gen or AMD Ryzen 5/7 equivalent) and a recent discrete GPU will run most PS2 games at 2x–3x resolution without issue. Integrated graphics can handle many PS2 games at native resolution but will struggle with heavier titles. On Android, high-end Snapdragon 8-series devices have the best results; mid-range Snapdragon and most Mali GPU devices should stay at native resolution for demanding games.
Game-specific notes
| Game | General behavior | Renderer note | Common issue | Tested Result |
|---|---|---|---|---|
| God of War | Demanding on both CPU and GPU. Runs well on modern mid-range desktops, needs careful settings on Android. | Vulkan recommended. Some shadow/lighting effects look better on OpenGL on certain GPU drivers. | Heavy combat scenes and large areas drop frames when CPU is the bottleneck. Slow motion here usually means CPU limit, not GPU. | In our test, God of War ran at full speed at 2x internal resolution on a Samsung Galaxy S23 Ultra with 12GB RAM and 256GB storage. At 3x resolution, the Hydra fight dropped to around 45fps during heavier scenes. |
| Gran Turismo 4 | Playable, but more sensitive to renderer and resolution choices than most PS2 games. | Both Vulkan and Direct3D work. Some users report less ghosting with Direct3D 11 on NVIDIA hardware. | Ghosting on car edges, motion blur artifacts, and slowdown during replays. These usually appear when upscaling is too aggressive. | On a Ryzen 5 5600, GTX 1660 Super, and 16GB RAM Windows PC, Gran Turismo 4 felt best at 2x internal resolution with Direct3D 11. Vulkan was playable too, but Direct3D 11 gave cleaner car edges in races and fewer ugly ghosting trails during replay cameras. At 3x, the sharper image was not worth the extra artifacts. |
| Shadow of the Colossus | One of the heavier PS2 games. CPU speed matters more here than GPU. | Vulkan or OpenGL both work, but visual output can differ. Test both if you see odd fog or lighting. | Frame drops in open fields and during some colossus fights. Native resolution is the stable starting point even on capable hardware. | Tested on a Ryzen 5 5600, GTX 1660 Super, and 16GB RAM Windows PC, Shadow of the Colossus stayed most consistent at Native resolution with Vulkan. 2x was fine in quiet areas, but open fields and larger colossus fights made the dips much easier to feel, especially during wide camera movement. |
Common PCSX2 problems and fixes
- PCSX2 opens but no games appear: The game folder was not added, or the files are still compressed. Add the exact folder containing your game images, extract ISO or CHD files from any ZIP, RAR, or 7z archives, and refresh the game list.
- No BIOS found: The wrong folder is selected. Choose the folder that directly contains the BIOS files — not the folder one level above it.
- BIOS folder is correct but PCSX2 still does not detect it: Check whether the BIOS file is inside a subfolder inside the selected folder. PCSX2 does not scan subdirectories. Move the files up one level so they are directly inside the selected folder.
- Game boots to the PS2 browser instead of launching: PCSX2 is not reading a valid disc image. Boot the ISO, CHD, or CUE file manually. If that also fails, test a different game image before changing emulator settings.
- BIN game does not work: The CUE file is missing or separated from the BIN. Keep both files in the same folder and load the CUE file, not the BIN.
- Audio crackles: The game is running below full speed. Lower internal resolution, close heavy background apps, and confirm performance is stable before adjusting audio settings.
- Game runs in slow motion: Hardware is not keeping up with the current settings. Return to native resolution, try Vulkan or Direct3D, and reset speed settings to default. Audio crackle alongside slow motion almost always confirms this is a performance issue.
- Controller does not respond: Open controller settings, create a new controller profile, and map the pad as a DualShock 2. Confirm analog sticks are mapped before testing any game.
- Game does not save: Check that a memory card is assigned to Slot 1 in Settings → Memory Cards. If the card is full, create a new one or free space by deleting old saves from inside the emulator’s memory card manager.
- Android build cannot access game folder: Move the games to Download/PS2 or Documents/PS2 Games and rescan. The Android file picker blocks access to protected locations like Android/data.
- Game looks blurry: Native PS2 resolution is low. Raise internal resolution to 2x or 3x only after confirming the game already runs at full speed at native resolution.
- Upscaled game has broken effects or textures: Some PS2 effects do not scale cleanly. Try native resolution first, test a different renderer, or use a per-game setting rather than changing the global setup.
Practical wrap-up
The four things that actually matter for a working PCSX2 setup: use the correct build for your platform, select a valid PS2 BIOS folder with the right region, add a folder of supported disc images, and start with native resolution and default settings.
Once a game boots and runs at full speed, raise internal resolution, configure per-game settings if needed, and confirm your memory card is in place for proper saves. The most common mistake is trying to optimize settings before confirming the basics work. Get one game running first. Then improve the visuals.
For the correct version for your platform: Download PCSX2 Emulator.